Teaching Tuesday- All About Hand Sanitizers

Everyone knows that good hand washing is the first line of defense in protecting your health and stopping the spread of germs. Many bacteria can live on surfaces for hours, some many days. And, of course, viruses, especially ones that attack the stomach and intestines,  also can be picked up and transmitted when your hands touch surfaces where they reside and then make their way to your open skin, mouth, or a mucous membrane. 

In fact, studies show that the that the computer keyboard, the phone receiver, and the desk are worse than the bathroom in terms of being covered with micro-organisms. While washing with plain old soap and water should be your first choice, when you're stuck between meetings, about to grab lunch at your desk, or have to use somebody else's keyboard, using a hand sanitizer (before and after) is a good idea.  Even when you are at home there are many times when it's difficult or inconvenient to get to soap and water, so using a sanitizer is quite helpful. 

And hand sanitizer was created just for these instances and more. Hand sanitizer has become quite popular, in fact, you can find hand sanitizer dispensers in most  all hospitals, daycares, airports, and even many department stores and shops now set out large bottles for customer and employee use, especially during flu season. But do you know all that you need to know about the hand sanitizer?

The first thing you need to know is if the particular one you have will be effective. Just because it says it will kill the microbes doesn't mean that it will. Studies show that there needs to be a concentration of at least 60% alcohol to effectively dispatch the nasties (whatever type of alcohol is used, so you may see; isopropyl, acetol or others). Believe it or not, there are several on the market that do not meet this threshold. This is especially true in ones that are marketed as "children's hand santizer". Also, this threshold needs to be taken into consideration when creating your own hand santizer, or using one made by someone else.

Once quality is assured, the issue then becomes quantity. If you don't use enough product to do the job, your efforts are wasted, as germs will remain and can still be transfered. So just how much is enough? You need to (vigorously) rub your entire hands, all sides, with enough gel (or foam) to get them wet, and then rub them together until they are dry. If your hands are dry within 10 or 15 seconds, according to the C.D.C. guidelines for health care workers, you haven't used enough product.  

As an aside, some of the homemade recipes for sanitizer depend upon other ingredients, such as essential oils, to augment or even replace alcohol as the active ingredient(s). While many EO's have been proven to posses antimicrobial/antiviral properties, I would venture to say that it is beyond the scope of the average kitchen crafter to create an adequate sanitizer formula  without using a 60% concentration of alcohol. And any such formulations should be laboratory tested for their effecy.  Consider this when making your own sanitizer, as well as when you are buying from an Indie company. After you do the research, read all the labels, and ask any questions you may have, you may just find that the best quality, and and least expensive hand sanitizer is a commercial one. I never, ever thought that I'd say such a thing, much less mean it. But in this instance, the assurance of a safe and effective formulation, coupled with the cheap cost, certainly outweigh my need to create. Besides, it gives me more time for making soap! Lol 


Friday- More Under the Radar Essential Oils-Davana

Continuing on in the series of Essential Oils that may be under your radar, today we will be discussing Davana.


Essential oil of Davana, botanically known as Artemisia pallens, has a fruity, sweet, rich, base note scent, and has a brown, viscous consistency. It is steam distilled from the leaves and the flowers of the aromatic herb. It is shrub like in appearance and bears numerous small yellow flower heads, with a silvery white silky covering of down, that gives the foliage a rather gray or white appearance.  It actually belongs to the daisy family, and is native to India, who remains its largest producer today. It generally grows near sandalwood trees, but has not really gained much popularity in its home country. It has a history of being mostly exported to France, the USA, Germany, Japan and the Netherlands, and has been commercially cultivated since the 1970's. Since its small seeds and delicate seedlings require extreme nurturing and care,  successful maturation in the wild is very rare. 


The davana plant is mainly cultivated in order to make garlands and for making the essential oils. But, an infusion of the plant has been used to help lower blood sugar levels in diabetics. And, in India, the blossoms of the plant are used as an offering in their Religious ceremonies. Reminiscent of apricot fruit, the oil is often used in desserts, sausages, tobacco and pastries. 

 This EO possess aphrodisiac properties. It is extremely soothing to the brain and the nervous system, so it also helps to fight depression and other stress related symptoms. It also has antiseptic, antiviral, and disinfectant properties. It is also considered to stimulate the endocrine system, and to counter headaches, joint pain, and high blood pressure. It also possesses emmenagogue, expectorant, sedative, and vulnerary qualities. Its regular use results in silky, smooth, healthy skin. Although it should not be used during pregnancy, its use in a diffuser will take advantage of a few of its properties. The disinfectant properties will help to cleanse the air, especially during cold and flu season, while the nervine and sedative properties will help to ease stress and anxiety. And, of course the oil will add a sweet, interesting note to any blend you create.

This EO is rather high priced (72-100$ an ounce), and is quite prized in the perfumery industry. Aside from its rich aroma, it is largely desired because, when it is applied (topically), this oil is believed to give off a different aroma for each person. So it is used to make individualistic perfume blends.


Tripod Thursday- What the Woods hold

Today's photographs are from around my neck of the woods. I love rural America!


What's Up Wednesday-Easy Risotto

This weeks business has really been limited to filling orders, packaging, mailing and label making. And, since that is hardly revolutionary, I thought I'd tell you about a great recipe I came across on AllrecipesI absolutely LOVE risotto, but the twenty minutes of stirring is for the birds! Although I have done it a few times, since the rest of my family really doesn't care for the taste of risotto, it isn't worth all that effort. Of course I was doubtful when I saw this microwave risotto recipe, but I decided to try it the other night when I was hungry, alone, and had just a smidge of arborio rice left in the jar. 

One of the neatest things about the Allrecipes site is that it will re-size any of its recipes for you. So not only did I NOT have to stir forever, I didn't have to do the math to get a serving size of two! Yes, I did it for two, did I mention that I love risotto? Lol Not to mention, this recipe took care of the last of the rice. Anyway, I was rather skeptical, as you probably are if you are familiar with risotto. Everyone always says that you can't reheat risotto, and microwave food is usually rough, so I just assumed that this would be a dud. But I have to say that I was pleasantly surprised! In fact, I was gob smacked! This was a truly good risotto! Although I think it would have been rather bland without the wine, so you may want to consider that and bump up the spices if you choose to use all broth. 

I did make a few changes to accommodate my personal preferences. I used chicken broth instead of vegetable broth, a bit more onion and garlic than was called for as well, and Gorgonzola cheese instead of Parmesan cheese, just because it was what I had that was fresh.

In attempting to follow the directions to the letter, I found that I needed to add a tad more liquid than it called for during step four. This may have been because my lid wasn't tight enough (I used a Pyrex dish and its glass lid), but I didn't need that much more, just a jig, at about 7 minutes in. I have to say that it looked and tasted  perfect. It was every bit as good as the squash risotto that I stirred for nearly a half an hour at Thanksgiving! I will most certainly be preparing mine this way in the future, and with chicken, pumpkin, squash and whatever else I can think of!  But don't take my word for it, try it yourself! 

By the way, this recipe received 4 1/2 stars out of 5 stars on the sites rating scale, and that was from 169 reviewers. More than 3,763 people have saved this recipe. Of course, you can make that 170 when I add my review! 

Ingredients

  • 3 tablespoons butter
  • 1 clove garlic, minced
  • 1 onion, chopped
  • 1 1/2 cups vegetable broth
  • 1 cup uncooked Arborio rice
  • 3/4 cup white wine
  • 1/4 cup grated Parmesan cheese

Directions

  1. In a 3 quart, microwave safe casserole dish combine butter, garlic and onion. Place dish in microwave and cook on high for 3 minutes.
  2. Place vegetable broth in a microwave safe dish. Heat on microwave until the broth is hot but not boiling (approximately 2 minutes).
  3. Stir the rice and broth into the casserole dish with the onion, butter and garlic mixture. Cover the dish tightly and cook on high for 6 minutes.
  4. Stir wine into the rice. Cook on high for 10 minutes more. Most of the liquid should boil off. Stir the cheese into the rice and serve.

Teaching Tuesday- Under the Radar EO's- Copaiba Balsam

Continuing on in our series of Essential Oils that may not have 

been on your radar, today we will be looking at Copaiba Balsam


Copaiba Balsam Essential Oil (EO), botanically known as Copaifera Officinalis, has a mild, sweet, woody and slightly balsamic fragrance, that provides a base note in formulations
The EO is steam distilled from the crude balsam of the wild-growing, Copaiba tree. Primarily found in the forests of Brazil, Columbia, Peru, and Venezuela, this well branched, tropical tree grows up to 100 feet tall. It has leathery leaves, and the blossoms are small, white, and quite fragrant. It produces a fruit that is leathery and only contains one seed, and is classofoed as  a leegume. The part of the copaiba tree that is used to make the EO is the balsam, which is the oleoresin. But, while it is called a balsam, it is really more of a natural oil, not a balsam. It is a thick, rather clear or pale yellow, but deepens to a fairly golden yellow color as it is exposed to air. This resin accumulates in cavities that are in the trunk of the tree. Then incisions are made in teh trunk in order to tap the resin.


This herbal oil is used as an emollient in lacquers and paint, and is used in art restoration to restore coloring to old paintings. But the most important properties of the copaiba tree are due to its oil, and the medicinal properties of that oil. In fact, from 1820 until 1910 copaiba oleoresin was listed as an official drug in the US Pharmacopeia. Copaiba oil has been documented to have antibacterial properties, and additionally is believed to have anti-inflammatory, disinfectant, diuretic, expectorant, and stimulant properties. It especially benefits bronchitis, bruises, burns, chills, colds, coughs, cuts, cystitis, intestinal infections, stress related conditions, and other urinary issues. In skin care, this EO is best used to treat cuts, burns, and bruises, in compresses, balms, or ointments. Considering its properties, and the fact that it is a base note, this EO makes a great fixative for your disinfectant blends, either for surfaces or for diffusers. And, of course, this EO is also great for scenting perfumes, soaps, lotions and other bath and body products. The only safety warning is to avoid this EO during pregnancy. 


Make it Yourself Monday- More Facial Masks

I know that I have posted several masks before, but here are some different ones.

Mint Mask
1/4 cup soy powder
1/4 cup plain yogurt (unflavored)
2 drops peppermint EO

This is a make and use immediately product. Mix the soy powder and the unflavored yogurt together, creating a paste. Then add in the EO and mix well. Put it on your face and neck and allow it to set for 20-30 minutes, then rinse with tepid water and pat the skin dry. After drying, don't forget to moisturize as you normally would. This mask is for all skin types, but especially benefits dry skin, as it won't over-dry the skin. The peppermint EO serves to clarify the skin. You should use this treatment once a week for great skin care.


Mean Green Mask
This next mask is a variation on two others that I have previously posted. This one mixes cucumber and clay, for one refreshing and moisturizing mask. It is another one that needs to be used once it is made. You will need;

1/4 cup French Green Clay
1 large cucumber, peeled and mashed
9 ml sweet almond oil (you may sub apricot kernel oil)
*distilled water may also be needed, depending upon the moisture level in the cucumber

After you have peeled and mashed the cucumber, place it in a bowl with the French Green clay and mix well. If the cucumber doesn't give enough moisture, add in enough distilled water to make the paste easy to apply. You want a soft, but not runny mixture. Once you have the correct consistency, apply it to your face and neck, and allow it to dry thoroughly. Stay still while the liquid evaporates from the recipe, which should take about 15 minutes. It will feel like it is pulling and this is the action that tightens your pores. Once dried, wash it off your skin with tepid water, pat dry, and moisturize as normal.

**I have a correction from last Friday's post as well. The Citrus Lavender soap does not have cocoa powder in it, but instead has vanilla powder. I have added a note to that post to correct the error.

Friday- More Coloring Soaps Naturally

In reviewing my Wednesday post I realized that I left Safflower off the list. So we will begin with it! Safflower will give you a nice yellow color. Add one to two teaspoons per pound of oils, depending upon the shade of yellow you desire.


Sandalwood Powder will give a purplish red to a maroon color, depending upon the PH level. A lower PH will give a more maroon coloring and a higher PH will give you a purplish coloring. Use at 1/2 teaspoon per pound of oils. 


Alkanet Root Powder gives a pinkish red to a bluish purple coloring, also depending upon the PH level. A PH of 6 will have a red color, a PH of 8 will be lavender/purple, and a higher PH will be more blue. For every two ounces of base oil, infuse one tablespoon of alkanet. For your soap, add about four tablespoons per five pound batch of soap. 
*of course the amount you use and the types of oils in your formulation also influence the final color.


For a green color in your soaps try some;


Burdock Leaf gives a nice, natural green. This is best when infused in a base oil, either by the hot or cold method.


Comfrey Leaf will also produce a nice, natural green. The leaves  can be infused in the base oil, using one part comfrey to two parts oil, or you can add the leaf powder straight into your batch at light trace, one tablespoon per pound of oils. You can also infuse the powder into the base oil, but you will need to use a cheesecloth to strain it prior to using it.


Dandelion Leaf powder is also good for a green. Use one to two tablespoons per pound of oils at light trace, or infuse in your base oil.


Then we come to my personal favorites;
*The above photo is of my Bamboo Soap and is made with cocoa powder and spirulina for coloring.


Nettle Leaf Powder, which gives a green that is pretty close to a lime green. It can be added directly into your soap pot or it can be infused into your base oils, whichever you prefer.


And Spirulina, which gives a nice, rich green. This works best when added straight into the soap pot. Depending upon the shade of green desired, adding 1/2 to one teaspoon in a five pound batch is generally recommended. Although I have seen it as high as one teaspoon per pound of oils. 


You can also use; French Green Clay, AlfalfaChlorophyll, or Olive Leaf powder for various shades of green. 


Cherry Bark Powder makes a nice warm, reddish-brown color. Use two tablespoons in a five pound batch of soap. It is best to take one cup of your batter out and mix the tablespoons in. Once you have it well incorporated, mix that cup back into the whole batch.


Tomato Powder makes a nice tomato red color, but it also has the scent of tomato since it is the actual dehydrated fruit.
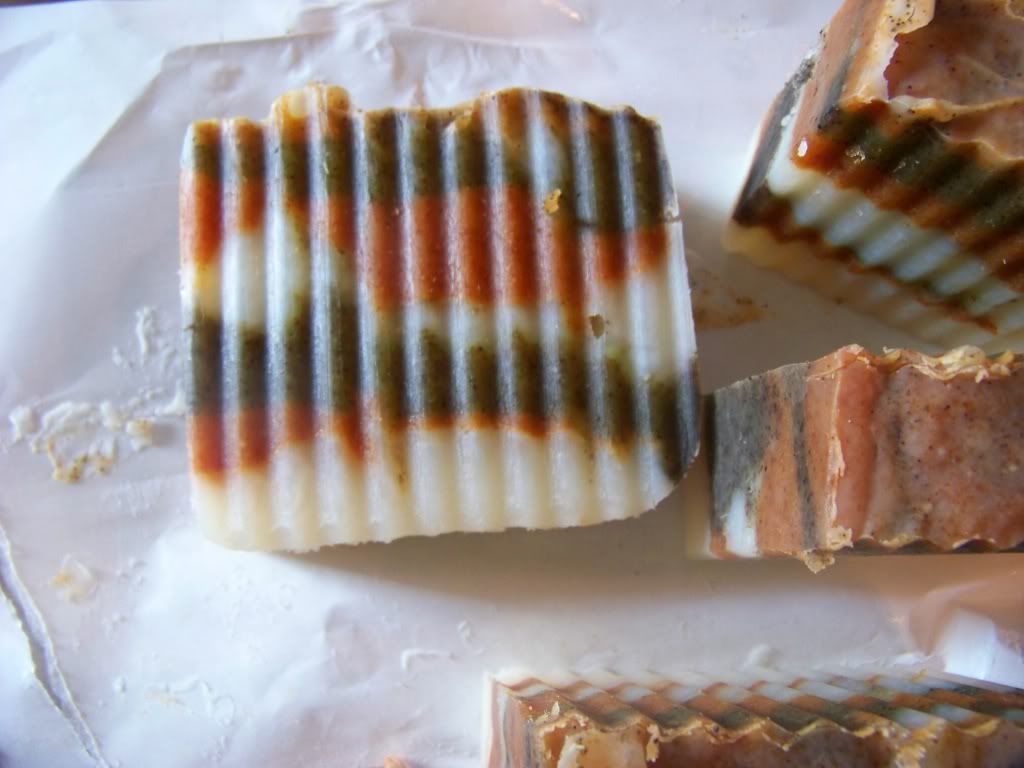
This soap is a tomato soap and the green and brown coloring is from Neem powder.


Rattanjot will make a light lavender brown color to a deep purplish brown in your soaps.


For Browns try;
Walnut Hull Powder will produce a rich, nutty brown color in your soap. Add 1/4 teaspoon per pound of oils. For a deep, dark brown use up to 1/2 teaspoon per pound of oils. This is a great additive for creating a swirl color or a nice contrast color.


*The picture to the right is of my Kitchen/Gardener Soap. It is colored with coffee and has coffee grounds in it as well. It also has a small amount of cocoa powder sprinkled on the top.

Cocoa powder also makes a natural, deep brown that is great for contrast and swirls. Mix one tablespoon into 1/2 cup of your soap batter at trace, then mix that half cup back into your entire batter.  
The middle layer of this Citrused Lavender soap is cocoa powder. The picture isn't nearly as pretty as the soap is in real life. The brown swirly layer really pops! The bluish bottom is a combination of blueberry fibers, indigo, and vanilla powder.
*Correction! The brown in this soap is actually vanilla powder.


Coffee and Coffee Grounds also make a nice brown coloring for soap, not to mention that the grounds make a wonderful scrubbing additive.


Poppy Seeds will be a blue gray to black flecks in your soaps.


Blues are the most difficult colors to achieve naturally, but it can be done! A plant that is high in azulene will give a nice blue, even though it may fade when its left for a long period of time. So (Common) Yarrow, botanically known as Achillea Millefolium, Blue Tansy, and German Chamomile are your flowers of choice for blue.
Then there is also;
 Woad Powder is a nice sky blue color in soap and you only need 1/8 to 1/2 of a teaspoon per five pound batch of soap, depending upon how deep a color you want.


And Indigo Powder, which will give you a more denim blue, but still with only 1/8 to 1/2 of a teaspoon for a five pound batch of soap! 


Frequently I will mix one or more of the coloring agents to create a deeper shade of a color or even a new one all together. Play with them and find your own color combinations!  The picture above is of my Orchid Rain (a proprietary blend), colored with a mixture of cranberry powder and blueberry fibers


In case I forgot to mention, as I think I did, Clays, for coloring, should be added at a rate of one tablespoon per pound of oils, either to the hot oils or at thin trace.